

Friday, August 12, 2011
Wednesday, May 11, 2011

Wednesday, April 20, 2011
Scrapbook Layout (Elements of Style - Stamp Set )


- Elements of Style item 119910 (w) 120045 (c)
- Regal Rose colored texture paper item 119941
- Old Olive smooth card stock item 100702
- Crochet Trim item 118481
- Antique Brads item 117273
Saturday, April 16, 2011
Grab a Bag of Stampin' Up! products for a great Price!

Hurry while Supplies last! Only available online.
Grab a bag of Stampin’ Up! products! The $5 (Small) contains $20. The $10 (Medium) Grab Bag contains $40 and the (large) $60 worth (original retail value) of discontinued products, including any combination of products like the following: ribbons, Accents & Elements, chipboard, Designer Series Paper, or Simply Sent kit components (components could include precut card stock, envelopes, buttons or brads, ribbon pieces, etc.). Grab bags do not contain stamp sets or tools.
Wednesday, March 30, 2011
Sale.a.Bration Bliss Card
This card is stamped with Sale.a.bration's Bliss Stamp Set. Hurry the sale ends March 31, 2011. This stamp set is only available until March 31, 2011 and you can get it FREE when you purchase just $50. You can earn even more stamp sets for instance if you spend $150 you can choose 3 stamp sets for FREE!! They are worth up to $14.95 each. SHOP NOW!


Wood Mount Bliss Stamp Set 121851
Clear Mount Bliss Stamp Set 123217
Saturday, March 26, 2011
Thursday, March 17, 2011
Jumbo Paper Clip Book Markers
These are so cute! Make these book markers out of the Stampin' Up! Extra Large Scallop Punch and the Large Circle Punch. I used a Flower for all Seasons stamp set then I filled it in with Stampin Write Markers. Use the Jumbo paper clips then attach tape over the paper clip to hold it to the bottom scallop, put Stampin' Up! dimensionals to attach the other scallop. Make sure the two scallops are lined up. Have fun! A set of these would be perfect as a teacher appreciation gift!

2-3/8" Scallop Punch Item 118874
1-3/4" Circle Punch item 119850
A Flower for All Seasons stamp set item 111592
1-3/4" Circle Punch item 119850
A Flower for All Seasons stamp set item 111592
Stampin Write Markers Brights item 119702
Thursday, March 10, 2011
Create a Cupcake Card! Oh so Yummy!
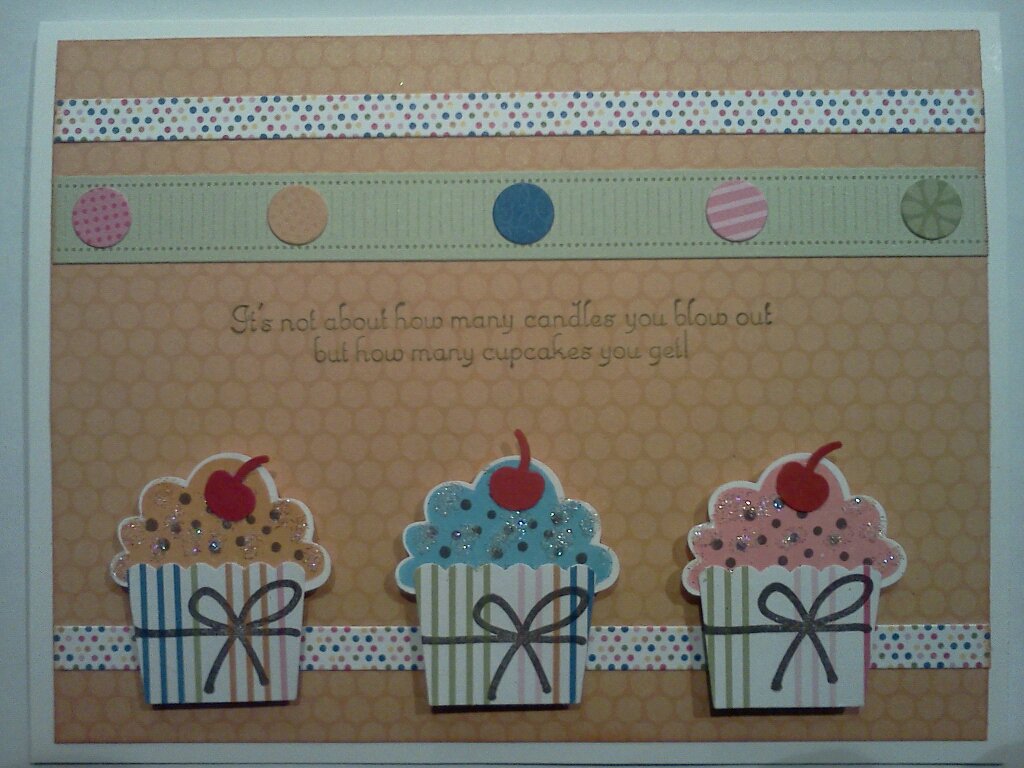
I love this stamp set from Stampin' Up! I love that it has a coordinating punch, I can use the punch so quickly vs cutting them out with scissors.
Supplies Used:
- Ice cream Parlor designer series paper - Sale.a.bration catalog (free when you spend $50). item 122242
- Whisper White card stock - item 100730
- Create a Cupcake stamp set - item W 121915 C 121982
- Build a Cupcake punch - item 121807
- Early Espresso ink pad - item 119670
Thursday, March 3, 2011
Chocolate Bar Wrapper Project


I created this chocolate bar wrapper with the eat chocolate stamp set from Stampin' Up! found in the Occasions Mini Catalog! I love this stamp set, you can use it for different occasions. I think it would be perfect for Valentine's Day or even Easter. One of these two days you give a lot of chocolate out so you can incorporate this stamp set with one of your gifts. I gave one of these to my cousin who is recovering from surgery, I thought the last thing she would do is any chores but definitely chocolate would make her feel better!
Supplies used:
- Ice cream Parlor designer series paper pack - free when you spend $50 - 122242
- Tempting Turquoise card stock - 102067
- Whisper White card stock - 100730
- Eat Chocolate Stamp Set W - 122453 C - 122455
- Chocolate Chip Stamp Pad - 100908
- Flower Button Pacific Point - Free when you spend $50 - 123529
- Hemp Twine - 100982
- Glue Dots - 103683
- Sticky Strip - 104294
Monday, February 28, 2011
I Got A Blog Makeover!
A while ago I signed up with So Stylilized Custom Blog Designs for a free blog design. I went on their waiting list and walla I have a new look! Jessica from So Stylilized was great she got it done in no time! You can check out her blog here at http://sostylilized.blogspot.com.
Jessica's services are free she only requires you leave a tip how awesome is that! Leave me a comment and let me know what you think!
Saturday, February 26, 2011
How to Apply Ink to your Clear Mount Stamp Video
I have some new customers that have never stamped before so I thought I would make a quick video to show how to apply ink to your stamp and stamp an image.
The set I'm using in this video is called Punch Bunch. It's called this because you can order coordinating punches for this stamp set. After you stamped your image you can punch them out, how easy is that!
You can get this stamp set for free during Stampin' Up! Sale.a.bration promotion! Just spend $50 and receive it for FREE!
This is my first video so please forgive I'm a little nervous. Thanks for watching!!
Monday, February 21, 2011
(Sale.a.Bration 2011) Something to Celebrate! Free Stamp Sets
How does Sale.a.bration work?
This promotion only happens once a year! When you spend $50 you will get a free stamp set worth up to $14.95 from the
Sale.a.bration's catalog.
Email me!
or shop online
Thursday, February 17, 2011
Saturday, February 12, 2011
Stampin' Up! Create a Cupcake Card

Click the Link to get dimensions and tips to create this cute card!
Stampin' Up! demonstrator site and online sto
Sunday, January 30, 2011
Tilda and Edwin Card Class
My Copics marker class was today. I colored three cards in 3hrs, let me tell you it was hard! I would have done better doing 2 cards taking my time. I found that the color pencil technique is a lot easier to blend but do like the vibrant coloring of the markers. My hats off to you! All you Maggie lovers out there it is harder then it looks. This was my first time coloring with Copics and with a little practice I'm sure it will get easier. You can see I got tired by the third card for there is some visible mistakes.
Thanks for looking!


Sunday, January 23, 2011
First Tilda Cards ( Card #2 and #3)
These are the other two cards from my color pencil Tilda class. Coloring the Tilda's were very fun and addicting. I stayed up late to finish the Third one. Thanks for taking a look!
Shopping Tilda


Celebrating Tilda


First Tilda Cards!
My First Tilda Cards
Hi everyone, I took my class Saturday to learn how to color Tilda with color pencils. This is the first time shading and blending since high school art class. I did not know you could blend color pencils with Gansol which is just mineral spirits. The Gamsol take all the lines away and smooths it out like magic. I am posting a pic of the card and then a close up of the Tilda. We were to make all three cards within this one class, I had to take the third one home to work on. I can't work that fast! I was there for three and a half hours! It was fun and I learned something new! Next week I will be taking the class to color with copic markers. I have to post the others in a new post it won't let me load more pics??
Chinese Tilda


Thursday, January 20, 2011
Thursday Thoughts
I can't wait the weekend is almost here! I signed up for a class this Saturday, we will be making three Tilda Cards! I'm in love with these stamps by Magnolia.
Tilda is a little girl so cute looking. My first Tilda stamp has a cute bonnet hat with a rose on it and she is sitting wearing a darling dress with Maryjane shoes and socks.
I'm so excited to make my first Tilda card! I will be posting the cards I make from the class. The first class is being taught using color pencils and the second with Copic markers.
Tuesday, January 18, 2011
Cupcake Card ~ Create a Critter Cartridge (Cricut)

I made this adorable cupcake using the create a critter cartridge cut our at 3". I got a pack of blank round cards in the $1 bin at Micheal's. I did some foe stitching around the edges with a white gel pen. I stamped Hi cupcake with the distressed walnut ink from Tim Holtz and added some dots of pink stickles around the scallop that I also cut out on my cricut. Thanks for taking a peek!
Monday, January 17, 2011
Thank you card - using create a critter cartridge (Cricut)
Hi everyone! I made this thank you card for my in-laws for coming over every day to check on my buddies, my two best doggies! I mad this card using the create a critter cartridge by cricut. I cut the two dogies out a 2". I inked around the edges with moonlight white. I used a checkered pattern paper as my base and a matching solid on top of that. I hand painted a foe stitch around the solid paper and stamped the word thank you with distressed ink by the Tim Holtz collection. I added a button brad threw the little bone for a final touch! The create a critter is one of my favorite cartridges, it has a variety of the cutest little animals and is very easy to use. Thanks for looking!

Subscribe to:
Posts (Atom)